Sametime 901 and IP6

Now I don’t do Sametime very much, its a area of horror I leave to people like Gab Davis, but this this was a fix that Gab found that I felt needing sharing

So it was a standard install on a client site on clean windows 2012 servers built by the client. with only basic services to be provided, simples eh?

nope…

instead we get this bundle of fun when trying to login on the web client for meetings

CommunityServ W com.ibm.collaboration.realtime.stproxy.services.community.CommunityService doService, SID:
12345678-AAAA-1234-ZZZZ-123456789555 CLFRX0030E: Login is not completed in 10 seconds. User XXXX XXXX will be logged out.
that login is not completed in 10 secs

After a good deal of grumbling and checking of settings it was decided to make sure IP6 was not used, I checked in the windows setting and it did not look as if it was enabled, Gab however point out that that would not be enough and sent me to this

https://support.microsoft.com/en-us/kb/929852

which is a little download to completely disable the feature, I ran it on a the various servers and voilà , suddenly everything works.

Just a tip in case it is needed……

Salesforce Pardot Multi Completion Rules

I do pardot implementations amongst my other salesforce stuff, which always seem to involve a number of hacks to bend the Salesforce and Pardot functions to meet the existing behaviours that the client wants.

Now pardot has “completion actions” these are very useful jobs that are performed when a form is submitted, but limited in that they are not conditional, i.e. you cant say “if field X = Y then do W action else do Z action”, Pardot them selves show you a way round this using form field based completion actions.

This is a nice trick and can be used as a base for more complex things, namely running MULTIPLE completion actions, an example of which is shown below

<script type="text/javascript">
var email = encodeURIComponent('%%email{js}%%')
switch('%%CheckBox_1{js}%%')
{
case 'true': document.write('<iframe src="FORM_HANDLER_1_URL?email=' + email + '" height="1px" width="1px" ></iframe>');
break;
case '': document.write('<iframe src="FORM_HANDLER_2_URL?email=' + email + '" height="1px" width="1px" ></iframe>');
break;
};
switch('%%CheckBox_2{js}%%')
{
case 'true': document.write('<iframe src="FORM_HANDLER_3_URL?email=' + email + '" height="1px" width="1px" ></iframe>');
break;
case '': document.write('<iframe src="FORM_HANDLER_4_URL?email=' + email + '" height="1px" width="1px" ></iframe>');
break;
};
</script>

This means that you can run a lot of conditional rules based on the fields in the one form, the most common use I make of this is of a [Custom Email Preference Center Pages](http://help.pardot.com/customer/portal/articles/2125807-creating-custom-email-preference-center-pages) but one where a user can fill in more details than just their email address.
Oh one final note, you will see on the pardot instructions they close their iframes with a “/>” this wont work if you have multiple iframes on one page you need to close of iframes properly with “</iframe>”

DeathAdder Mouse On Linux

Silly little post and more an aide-memoire than anything, but recently I have been doing a bit of work on a VERY secure site, one that does not permit bluetooth of any form even for such things as mice, resulting in a quick pound down to PC World, after a squint down the rows of mice I realised that wired is really dead and there was none that I would not feel ashamed to use, dead that is apart from serious gaming, in that area there was a very pleasant and quality mouse in the form of the Razer deathadder chroma.

All was fine till I plugged the darn thing in and discovered its ultra sensitivity meant it was nearly uncontrollable and the normal UI sensitivity settings went nowhere near far enough down to make it usable, so back to command line we go.

So first lets get a list of the input devices on the system with:

xinput list

Now lets check this list for the first instance of “Razer Razer DeathAdder Chroma” in the pointers list and get its id number (in this case 12), then change its sensitivity as below, I find a value of 3 takes it down to the same level as a normal mouse

xinput set-prop 12 "Device Accel Constant Deceleration" 3

There we go, a usable mouse.

SalesForce for Domino Dogs 3: Web Query Save Agents

“WebQuerySave” / “PostOpen” and all its siblings have been a bastion of Domino and Notes developments since time out of mind and indeed they exist in a near identical form in Salesforce but just called Triggers

Just like Notes/Domino has different events that let code ‘Do Stuff’ to records e.g. “WebQueryOpen”,”OnLoad”, “WebQuerySave” etc etc, Salesforce has the same sort of thing, in their case they are broken down into 2 parts: Timings and Events

Timings: Before and After

Before: The Event has been started but the record has not been saved, this maps basically to the “Query” events in Domino.

If you want to calculate fields and stuff and change values in the record you are saving, this is the time to do that, you don’t have to tell it to save or commit the records as you normally would, it will run a save after your code is run.

After: The record has been saved, all field values have been calculated, then the After event is run.

If you want to update other objects on the basis of this record being created/saved do it here, you can’t edit the record you are saving, but lots of useful bits such as the record id and who saved it are available in the After event 1

Events: Insert, Update, Delete and Undelete

These are exactly what they say there, Insert is like a new document creation, Update is editing an existing document, etc etc

This then gives us a total set of different event types of:

  • before insert
  • before update
  • before delete
  • after insert
  • after update
  • after delete
  • after undelete2

Now you can have a separate trigger for each of these events, but I have found that this bites you in the bum when they start to argue with each other and hard to keep straight when things get complex, so I just tend to have one trigger for all events and a bit of logic in it to determine what’s going to happen when

Here is my Basic template I start with on all my triggers

trigger XXXXTriggerAllEvents on XXXX (
    before insert,
    before update,
    before delete,
    after insert,
    after update,
    after delete,
    after undelete) {
            if(Trigger.isInsert || Trigger.isUpdate) {
                if (Trigger.isUpdate && Trigger.isAfter) {
                   MYScriptLibarary.DoStuffAfterAnUpdate(Trigger.New, Trigger.OldMap);
                } else if (Trigger.isInsert) {
                    //Do some stuff here to do with when a new document being create, like sending emals
                }
            }
}

As you can see you can determine what event you are dealing with by testing for “.isInsert” or “.isAfter” and then run the right bit of code for what you want, again I like to keep everything in easy sight, so use functions when ever I can with nice easy to understand names.
In the above case, I want to check a field after there has been an update to see if it has been changed from empty to containing a value. you can do this with the very very useful ‘Trigger.New’ and ‘Trigger.OldMap’) as you can see below

public with sharing class MYScriptLibarary {
    public static void DoStuffAfterAnUpdate(List<XXXX> newXXXX, Map<ID, XXXX> oldXXXX) {
                for (XXXX curentXXXX : newXXXX) {
                    if(!String.isBlank(curentXXXX.MyField) && String.isBlank(oldXXXX.get(curentXXXX.Id).MyField) ) {
                        system.debug('OMG!!! MYField changed DO SOMTHING');
                    }
                }
          }
}

So we are taking the list of objects3 that have caused the trigger to run ie “Trigger.New”, looping through them and comparing them to the values in the Trigger.OldMap (which contain the old values) to see if things have changed.


So that is the theory over, you can see existing triggers by entering Setup and searching for “apex triggers”

BUT you cant make them from there, you make them from the Object you want them to act on.
Lets take the Case object for an example

In setup you search for case, and click on “Case Triggers” and then on “New”

That will give you the default trigger…. lets swap that out for the all events trigger I showed above

Better, then just click save and your trigger will be live. simples..
Now there is an alternative way to make triggers, and you do sometime have to use it when you want to create a trigger for an object that does not live in the setup, such as the attachment object.

You will first need to open the Developer Console up (Select your Name in the top right and select “Developer Console”), then select File –> New –> Apex Trigger

Select “attachment” as the sObject and give it a sensible name.

And now you can do a trigger against an object that normally you don’t see.

Final Notes:

1. Salesforce Process flows can fight with your triggers, if you get “A flow trigger failed to Execute” all of a sudden, go look to see if your power users have been playing with the process flows.
2. Make sure you have security set correctly, particularly with community users, both security profiles and sharing settings can screw with your triggers if you cant write or see fields.
3. As always make sure you code works if there are millions of records in Salesforce. CODE TO CATER TO LIMITS.

  1. You know that pain in the butt thing you sometimes have to do with Domino when you have to use the NoteID rather than that Document ID before a document is saved this gets round that issue.[]
  2. Yes eagle eyes, there is no “before undelete”.[]
  3. You are best to handle to handle all code in terms of batches rather than the single document you are used to in Domino, we will handle batching in a later blog, but just take my word for it at the moment[]

SalesForce for Domino Dogs 2: Scheduled Agents

Welcome to the second part of the Salesforce for Domino Dogs series. This one is a monster, but don’t worry we will be revisiting and clearing up some of the complex parts in other blog posts. What was a simple thing in Domino is quite complex in Salesforce and for a variety of very good reasons. So… scheduled agents.


Scheduled Agents: These little sods are the pain of many a Domino admin’s life. Personally I blame them for the lock-down of many a Domino server from the free-for-all that was so empowering to users, but sometimes there is no other way to get round limits or deal with certain triggered activities.

In Salesforce scheduled processes are a bit more complex than you might be used to, and this is not just a Salesforce thing, but a cloud thing—no cloud provider wants their platform just churning along in the background eating up cycles and I/O time.

So let’s break it down:

  1. The code that does stuff
  2. The scheduled task that the code sits in
  3. The schedule itself

1) The Code

So this CAN just be any bit of Apex you want, but most of the time you will actually end up using batch apex. Batch Apex is a whole set of articles in its own right, but in this case it’s just a way of getting round the Apex limits.

… hmmm that does not help. OK let me explain:

You know how with Domino scheduled agents, they will only run for so long before the agent manager shuts it down? This is to stop you writing rubbish code that screws up the system. Apex has a load of limits just like that, and the one that hits quite often is the limit that you can only send 10 emails using Send() in a given transaction (you can send 1000 bulk email per day). To get round this limit you have to “batch”, or break up your code into chucks. In Domino this would be like saying we want to process a whole view’s-worth of documents, but in chunks of say five documents at a time.

An empty bit of batch apex looks like this:

global class NotifiyAllUsersInAView implements Database.Batchable<sObject> {
    // The start method is called at the beginning of the code and works out which objects this code is goign to run agains.
    // It uses an SOQL query to work this out
    global Database.QueryLocator start(Database.BatchableContext BC){
    }
    // The executeBatch method is called for each chunk of objects returned from the start function.
    global void execute(Database.BatchableContext BC, List<Contact> scope){
    }
    //The finish method is called at the end of a sharing recalculation.
    global void finish(Database.BatchableContext BC){
    }
}

Let’s take it apart. First we will use the “start” function to get the list of objects we want to work through, so we take the empty function:

    // The start method is called at the beginning of the code and works out which objects this code is goign to run agains.
    // It uses an SOQL query to work this out
    global Database.QueryLocator start(Database.BatchableContext BC){
    }

… and add a search to say get all “contacts” in Salesforce. We only need the email address for these contacts1 so we add that as one of the fields which it gives us:

    // The start method is called at the beginning of the code and works out which objects this code is going to run against
    // It uses an SOQL query to work this out
    global Database.QueryLocator start(Database.BatchableContext BC){
        return Database.getQueryLocator([SELECT Id, Email FROM Contact]);
    }

Next we want the empty “execute” function which will do whatever we want with each chunk of objects it is sent:

    // The executeBatch method is called for each chunk of objects returned from the start function
    global void execute(Database.BatchableContext BC, List<Contact> scope){
    }

So in this horrible bit of code, the chunk of objects is passed in a reference called “scope” — we are then just iterating the objects and sending an email for each contact (you can see the email address stipulated in the “start” being passed in using “c.Email”):

    // executeBatch method is called for each chunk of objects returned from the start function
    global void execute(Database.BatchableContext BC, List<Contact> scope){
      for(Contact c : scope){
          Messaging.SingleEmailMessage mail = new Messaging.SingleEmailMessage();
          String[] toAddresses = new String[] {c.Email};
          mail.setToAddresses(toAddresses);
          mail.setSubject('Another Annoying Email');
          mail.setPlainTextBody('Dear XXX, this is another pointless email you will hate me for');
          Messaging.sendEmail(new Messaging.SingleEmailMessage[] { mail });
       }
    }

Finally we need an empty “finish” function which runs when all the batches are done:

    //The finish method is called at the end of a sharing recalculation.
    global void finish(Database.BatchableContext BC){
    }

So let’s send a final email notification to the admins:

    //The finish method is called at the end of a sharing recalculation
    global void finish(Database.BatchableContext BC){
        // Send an email to admin to say the agent is done.
        Messaging.SingleEmailMessage mail = new Messaging.SingleEmailMessage();
        String[] toAddresses = new String[] {emailAddress};
        mail.setToAddresses(toAddresses);
        mail.setSubject('Agent XXX is Done.');
        mail.setPlainTextBody('Agent XXX is Done.');
        Messaging.sendEmail(new Messaging.SingleEmailMessage[] { mail });
    }

Put it all together and you get:

global class NotifiyAllUsersInAView implements Database.Batchable<sObject> {
    // String to hold email address that emails will be sent to.
    // Replace its value with a valid email address.
    static String emailAddress = 'admin@admin.com';
    // The start method is called at the beginning of the code and works out which objects this code is goign to run agains.
    // It uses an SOQL query to work this out
    global Database.QueryLocator start(Database.BatchableContext BC){
        return Database.getQueryLocator([SELECT Id, Email FROM Contact]);
    }
    // The executeBatch method is called for each chunk of objects returned from the start function.
    global void execute(Database.BatchableContext BC, List<Contact> scope){
      for(Contact c : scope){
          Messaging.SingleEmailMessage mail = new Messaging.SingleEmailMessage();
          String[] toAddresses = new String[] {c.Email};
          mail.setToAddresses(toAddresses);
          mail.setSubject('Another Annoying Email');
          mail.setPlainTextBody('Dear XXX, this is another pointless email you will hate me for');
          Messaging.sendEmail(new Messaging.SingleEmailMessage[] { mail });
       }
    }
    //The finish method is called at the end of a sharing recalculation.
    global void finish(Database.BatchableContext BC){
        // Send an email to admin to say the agent is done.
        Messaging.SingleEmailMessage mail = new Messaging.SingleEmailMessage();
        String[] toAddresses = new String[] {emailAddress};
        mail.setToAddresses(toAddresses);
        mail.setSubject('Agent XXX is Done.');
        mail.setPlainTextBody('Agent XXX is Done.');
        Messaging.sendEmail(new Messaging.SingleEmailMessage[] { mail });
    }
}

So now we need to call this code

2) The Scheduled “Agent”

The code we have just written won’t run in a schedule on its own, we need to wrap it up in a bit of code that can run on a schedule and decide how big the chunks will be. In this case they can’t be more than 10 as we will hit the Apex limits for sending emails. An empty schedule wrapper looks like this (I have called mine ‘Scheduled_Agent’ but you can call it anything):

global class Scheduled_Agent implements Schedulable{
    global void execute (SchedulableContext SC){
    }
}

Now let’s create a new instance of the batchable code we created in section 1, tell it we want it to run in batches of 5 records or objects, and tell it to execute.

global class Scheduled_Agent implements Schedulable{
    global void execute (SchedulableContext SC){
      Integer batchSize = 5;
      NotifiyAllUsersInAView batch = new  NotifiyAllUsersInAView();
      database.executebatch(batch , batchSize);
    }
}

Code bit all done!

3) The Schedule

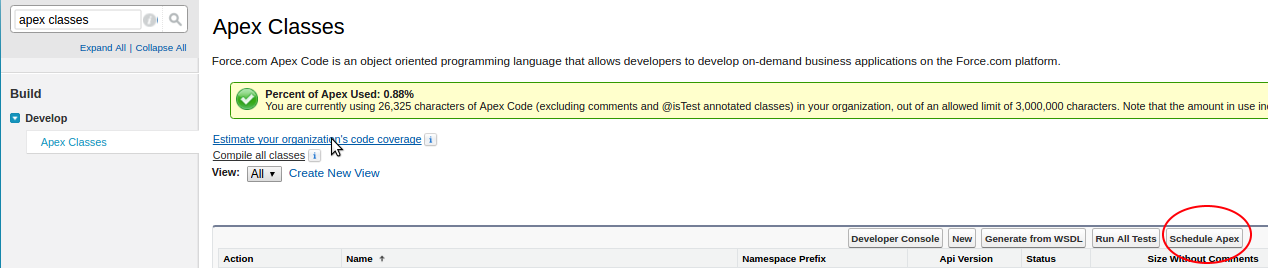
Now it comes time to actually schedule the code to run at a certain time, you can set this up via the user interface by going into Setup, searching for “Apex Classes”, and selecting the result:


Select “Scheduled Apex”


As you can see, the options are limited to, at most, a daily run—you can’t specify it to be any more frequent. However, we need to run to more often than that2.
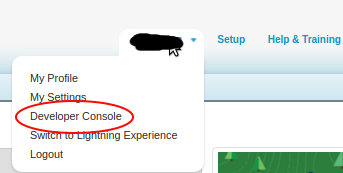
First open up your developer console, by selecting your name on the top right and picking it from the drop-down.


Now open up the “Execute Anonymous Window” from the debug menu.


You can now run Apex code manually, and as such you can schedule jobs with a load more precision using a Cron String. In this case we want to run the agent every 10 mins within the hour, so we create a new instance of our “Scheduled_Agent” scheduled class and schedule it appropriately:


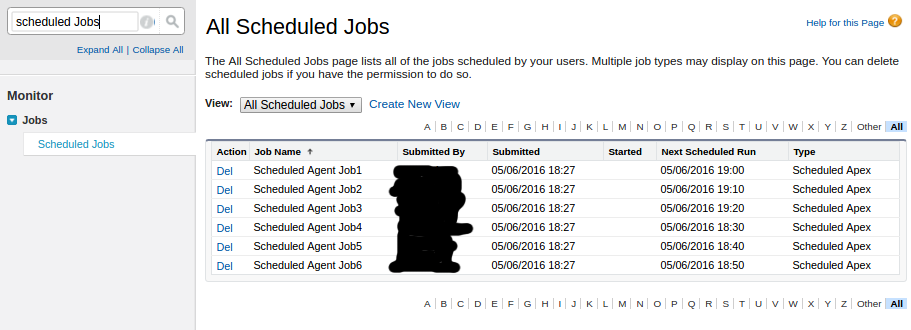
Click “Execute” and you can see the jobs have been scheduled. It should be noted that you can only have 100 of these in your org and this uses up 6 of them, so some planning would be good.

And there you go, scheduled agents. Let the legacy of horror continue!

  1. When you get an object via SOQL, you ask for all the fields you want, this is not like getting a Notes Document you don’t just get access to all the document fields automatically.[]
  2. Well we don’t but you just know someone will demand it to be sent more often.[]